I’ve had this clump forest for a long time, and have studied it for a while now. However I have never been thrilled by the trunk placement, or variation in trunk sizes. I have considered other fronts for the trees, but each time I found some flaws. I knew I had to get a second opinion.

Mike Rogers has been my teacher from the beginning and his eye for good bonsai is second to none. I knew he would know just what to do with this tree. After 12 years of doing bonsai I still consider myself a student and will be for life.
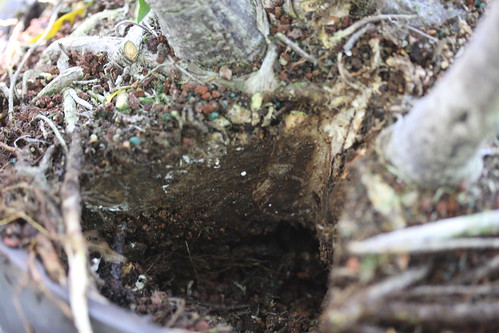
The first thing we addressed was to add an additional trunk to fill in an empty spot of the composition. That’s not exaclty easy since the entire base of the tree is one root. We had to remove a pie shape piece in order to insert one more tree.
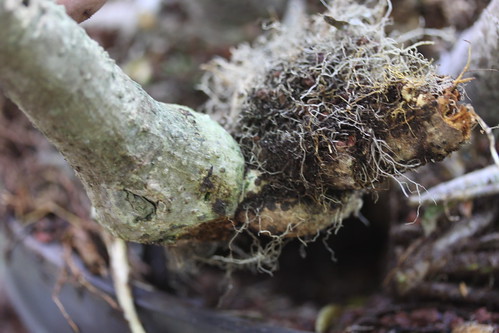
The new tree’s roots were pruned to match the space that was carved out. It would be a perfect fit.
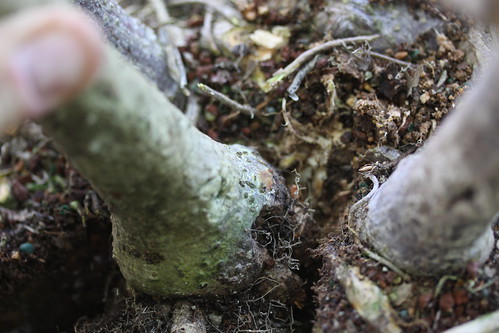
To make sure that the tree held it’s position and was able to fuse with the other trunks, a 2 inch screw was driven through the tree into the root mass of the main tree. The tree was very secure after this and the screw will be left in the tree which will cover over in time.
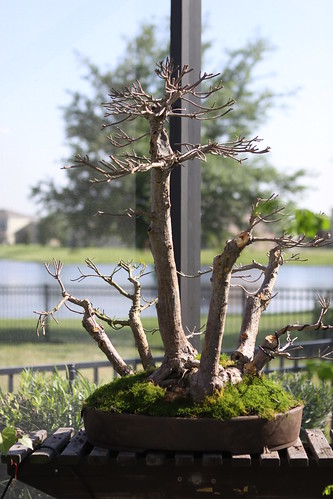
Lastly the tree was repotted into a smaller pot and a new angle. The newly added trunk is the second from the left. Notice how much more of a focal point the main tree is. This will be an outstanding planting in a very short time.

 Share on Facebook
• Thursday, February 18th, 2010
This year’s winter in Florida has been the coldest one that I can remember. However one good thing is that it gave me a long time to do some major pruning, repotting, and even taking some photos. Here are just a couple of shots that I took recently.

Crape Myrtle - defoliated
I can’t believe that it has been 5 years since the dwarf crape myrtle branches were grafted onto this wonderful crape myrtle trunk. However the development continues to improve. It has a great shape and balance. This year it should be the year for this tree to shine. In on a few weeks the tree will begin to leaf out and the canopy should be very full and complete. Who knows how much better this tree will be in 5 more years?

Black Pine repotted
I took advantage of the cold weather to repot this pine. I didn’t really remove much of the root mass, but it is a much more expensive pot. I still have a lot of branch development to do on this tree, but it already has developed very well already. Next year we’ll try a smaller pot to show off this large base of this tree.
Share on Facebook
• Sunday, February 07th, 2010
On a very cold day (for Florida) i was lucky enough to have the NoNaMe’ Bonsai Study group and Mike Rogers help me to move my large Trident Maple. Altough it fit nicely where I had it, I found that it was too difficult to work on it. So I decided to move it out into my yard for easy access. The fact that the tree and bonsai pot weigh about 500 pounds I’m not worried about it walking away.

The first challange was to get the tree out of the pot and then move the components separately.

Defoliating the Maple
We moved the tree into a plastic tub so that it could be moved more easily. Since the tree hadn’t dropped its leaves yet, the group helped the tree into dormancy by defoliating the tree.

setting the stand
The stand needed to be placed and leveled so that it would support the tree, and sit level. Edwin and David are using a level to make sure we had a perfect stand.

Finishing touches
I added some additional soil to stablize the stand while the rest of the group finished with the tree.

Combing the roots
One last task was to comb out the roots. I don’t know the next time I will repot this tree so we took advantage by working the roots prior to the repot.

Setting the Tree
The tree was then set in the pot (back towards the photo) and the soil was added. The sun rises from the right side of the photo and sets behind to the left. I am trying to develop my first branch and in order to maximize the sunlight we potted it facing this way.
Share on Facebook
• Saturday, October 24th, 2009
After consulting with a few other bonsai artist, in particular Mike Rogers. I found that the pot that this tree was potted in was too “Heavy” mass-wise for the tree. In Bonsai, everything is about perspectives and relationships. The overall height of a tree, is six times the width of the trunk at the base of the tree. The first branch should be located one third of the overall height of the tree. The width of the bonsai pot should be two thirds the height of the overall tree. The depth of the pot should be no more than then the thickness of the trunk.
I know that this seems to be a lot of math for such an artform. However the brain automatically makes these calculations and makes sure that all parts of the tree are in perspective as they relate the tree parts. It is that immediate feeling one gets when they look at art, a human face, or even a structure. If one aspect of the object are out of balance it can cause the viewer to see weakness, unbalance, or dislike for the object.
So with that said, the pot that I had this tree in before was too wide, and too deep. The color was good though, and that is why I used it in the first place. The tree is now potted into a new Tokoname pot that is with in scale and the color, although darker, is an accpetable finish and color for Junipers.

New Pot for Blue Alps Juniper
This tree still requires plenty of branch work, but it will come in time.
Share on Facebook