The most important thing about my on-line store is that I actually use the items that I sell. One item in particular is the Arbortech Mini-Grinder. Once I used one of these for the first time, I became a distributor so sell them. They are just that good!
Old wound scar
I’ve been working on large Neea Buxifolia for a few years now, but for the past couple it has been sitting in a greenhouse growing out. I was hoping to heal a large scar from a big cut made to shorten the tree. However it never healed. I knew if I ever wanted to develop this tree I needed to do a few things.
First would be to remove the old wood on the scar, and trim the cambium to promote healing of the wound. The best tool for this job, Arbortech Mini Grinder.
Carved trunk
Here is the after photo of the freshly carved area. Notice how the green cambium is now showing, and how I was able to remove the dead wood down to hard healthy wood. Also I used this opportunity to create some taper in the trunk. It was a large flat scar before, but now it is rounded and moves from wide to narrow. This should heal nicely.
Non-conifer cut paste
When it comes to big scars I use one product (Cut dressing 6044) more than any other. I’ve seen this stuff work on old wounds where normal cut paste didn’t. It stays on, and slowly flakes off as the tree heals.
Applying Cut Paste
Cut Paste Applied
It helps to warm a small ball of it in your hand before applying. Then just spread it over the wound, and covering any exposed cambium.
Neea Buxifolia
At this point I am just trying to develop the trunk line, and some minor branches. This tree has a long way to go, but this should give us a great start.
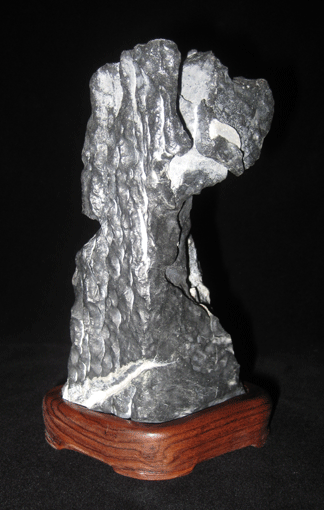
So for the holiday season I celebrated by buying a nice rock to create a Daiza. My good friend Jason of Schley’s Bonsai and Supplies in Holly Hill Florida had a great selection to choose from. I wanted a larger one than the ones I had done previously because I need something to display in my living room.
Precut rock
This one could have presented some challanges. However I had an idea.
Wetsaw cut rock
Using a wetsaw I removed the rounded unlevel bottom so that the rock would sit flat. This worked very well.
I placed the rock on the piece of Rosewood that I planned to use and traced around it.
Rough Cut
After I routered the base o fthe Daiza the rock fit in pretty easily. This still needed some work but was pretty easy up until this point
Daiza after initial final design
Well it still needs a lot of sanding and a finish, but it looks pretty good. I want to remove more from the underside to give it a lighter feel. There is still too much mass in my opinion. When it’s finished I’ll post an update.
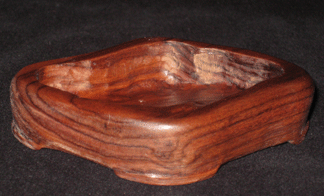
Okay I can’t get enough of making daiza. It is just amazing to me to start with a block of wood and then transform it into a flowing piece of furniture. I just love it. Well I wanted to show how my last daiza turned out, and show what else I have been working on.
Here it is after a light coat of SPAR Urethane. It really brings out the beautiful color of the Bolivian Rosewood.
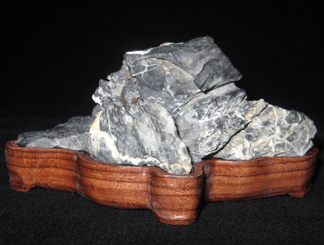
A member of the Central Florida Bonsai Club asked if I could make a daiza for one of his rocks. I of course agreed because I wanted to practice. This was a little more difficult because the bottom of the rock was not flat.
Sometimes I loose site of the daiza and just enjoy the entire Suiseki (rock & daiza). Here is close up of the daiza. Notice how much carving I had to do inside of it to get the rock to sit flat. Too bad this portion is covered, it is rarely ever seen.
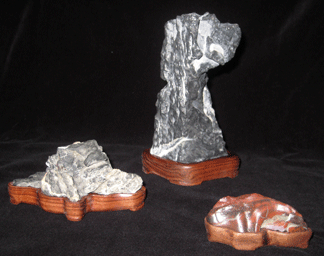
Here is the group of the daiza that I have made so far. They don’t take all that long to make, and are really enjoyable.
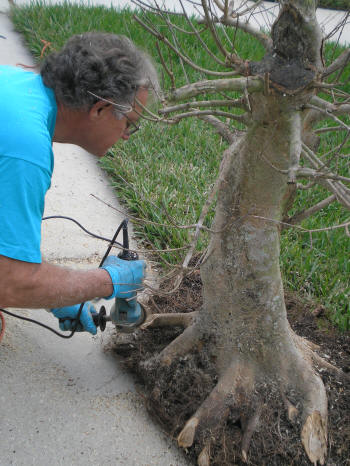
This is a picture of Mike Rogers using a grinder with a chainsaw blade to reduce and sculpt the roots so that it would fit into the pot. [Need a grinder]


